
To help you learn how to create sparkly holiday lights, I’ve started a new blog series I’m lovingly calling ‘Find Your Light’. A 3 part adventure where we’ll be cultivating and capturing the holidays (and beyond!) with what I think is the #1 tool you need to photograph effectively and beautifully. LIGHT. To kick off our series today, we’re going to start out creatively tackling one of the most difficult types of light faced by Momtographers: after dark indoor images.
Armed with piping hot travel mugs of cocoa, we pile into the car, tune into the holiday station, and head out into the night.
This is the only time of year that I don’t mind losing daylight before it’s time for dinner.
Twinkle lights line the streets of our town and we travel through neighborhoods new and old admiring how they sparkle and glow.
We oooooo and ahhhhh over the traditionally lit homes, stare in awe at the homes with blow up Santa’s and snowmen, and gawk at the homes that are barely recognizable after being decorated excessively.
Over the years, our holiday light tour has become a favorite family tradition and always leaves me inspired to come home and photograph the sparkly holiday lights our own tree.
Today I want to share 3 of my favorite ways to capture sparkly holiday lights: Sparkle Lights, Orb Lights, and Shape Lights.
My best advice for those of you excited to play, is to begin by practicing during a time after the kids have gone to bed. Shooting in low light after dark is a challenge for your camera. It can’t ‘click’ (aka: work the shutter) as fast which can lead to images being a blurry mess, especially if you add wiggly moving kiddos into the frame.
RIGHT NOW: Choose your favorite holiday decoration adorning your house (I chose Mr. Snowman) and let’s see what your camera can do without the kiddos in the frame first. Oh, and if you’re not already, you need to be out of AUTO mode. For you beginners out there, give Aperture Priority mode a whirl (that’s the A or Av on your camera dial).
Once you get these techniques down, if you want to add the kiddos back in GREAT! Just arm this with cookies or treats or something that will surely keep them still while you play.
Technique #1: Sparkle Lights
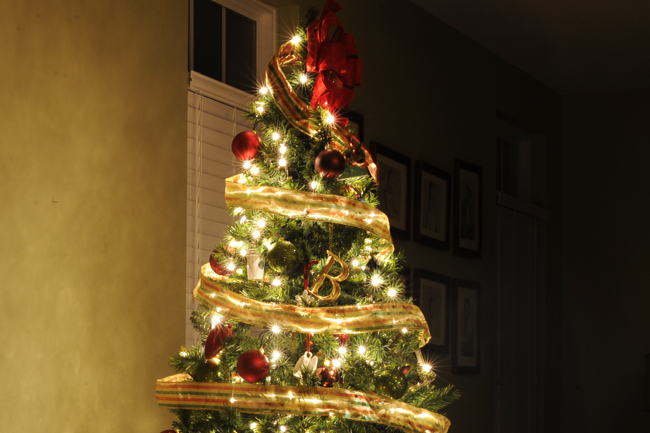 ISO 400, f 16, 5 seconds
You’ll need: A tripod or study surface to balance your camera due to the slooooooooow shutter. (yes this shot took 5 full seconds)
Light Tips: Turn most lights off in your house and allow the room to simply fill with the lights from your tree.
Tech Tips: High f-stop (aperture), low ISO. I used f 16 and ISO 400 for this shot.
The twinkles or starbursts on the lights will occur when you increase your aperture. Starbursts of light are really the only time I raise my aperture above f 8. You’ll see I’m all the way at f 16 for this shot. Keeping your ISO low will keep the shot looking clear, but it will make the shutter speed incredibly low which is why you need a way to keep your hand steady and your subjects still.
Technique #2: Orb Lights
 ISO 1600, f 1.8, 1/160
You’ll need: A good deal of distance between your subject and the lights.
Light Tip: Turn as many lights on in and around your subject as possible. The more light you have available the faster your shutter can click.
Tech Tips: Low f-stop (aperture), high ISO. I used 1.8 and ISO 1600.
The distance between your subject and the tree is what will allow the lights to blur and become those beautiful glowing orbs. I have about 6 ft of distance between Mr. Snowman and the tree. Also the close I can get to him (either by zooming with my lens or physically getting closer) the bigger those orbs will get too!
Technique #3: Shape Lights

ISO 2000, f 1.8, 1/40
You’ll need: A good deal of distance between your subject and the lights + plus a shape lens cover (more on that below)
Light Tip: Turn as many lights on in and around your subject as possible. The more light you have available the faster your shutter can click.
Tech Tips: Low f-stop (aperture), high ISO. I used 1.8 and ISO 2000.
This technique will work basically the same as #2 above, BUT with the addition of this cool shape cover on my lens I can make the bokeh (blurry lights) any shape I desire! Make note that with this cover you’ll lose some light coming in, which can make it necessary to raise your ISO and lower your shutter speed more that the Orb lights shot. If you’re uber crafty (unlike me) this blog post from Kevin + Amanda has one of the best tutorials I’ve seen. For the sake of my blog post I went with the impatient uncrafty approach to making a lens cover. (pictured below)
 Step 1: Cut out a circle the approximate size of your lens opening
Step 2: Cut a shape in the middle using sharpie scissors or an exacto knife, scissors, or special paper punch (like this one)
Step 3: Tape your cover over your lens with scotch tape.
Step 4: Have fun and play!
A few more tips: With the cover over the lens I found there was a very specific sweet spot of finding focus. If your lens has trouble focusing you may want to think about switching the lens to manual focus. Because of my lazy approach to this cover I see get a bit of a black ring around my images. I tried to back up a bit when shooting so I could crop out the ring in editing.
Have you tried any of these techniques before? Which ones are you excited to try this holiday season? Go get to practicing and while you’re at it check out the Momtography Classes. We tackle even more techniques and tips for capturing amazing photos this year!
Happy snapping! xo.